How to Create the Perfect Smokey Eye: Step-by-Step Tutorial
The smokey eye is a timeless makeup look that exudes sophistication and drama. Whether you're preparing for a special evening out or want to elevate your everyday look, mastering the smokey eye technique is an essential skill. This comprehensive guide will walk you through every step, from product selection to final touches, ensuring you achieve that perfect, sultry finish every time.
Understanding the Smokey Eye
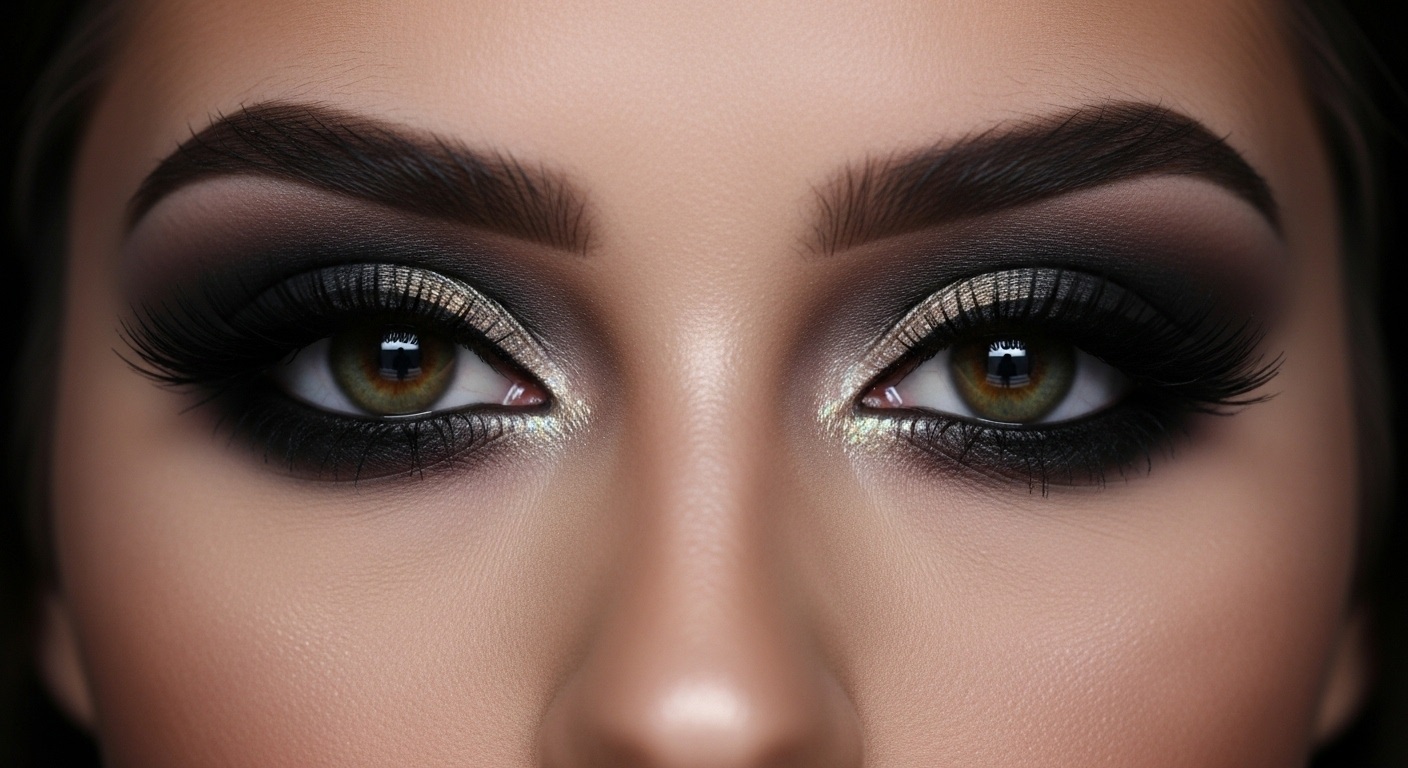
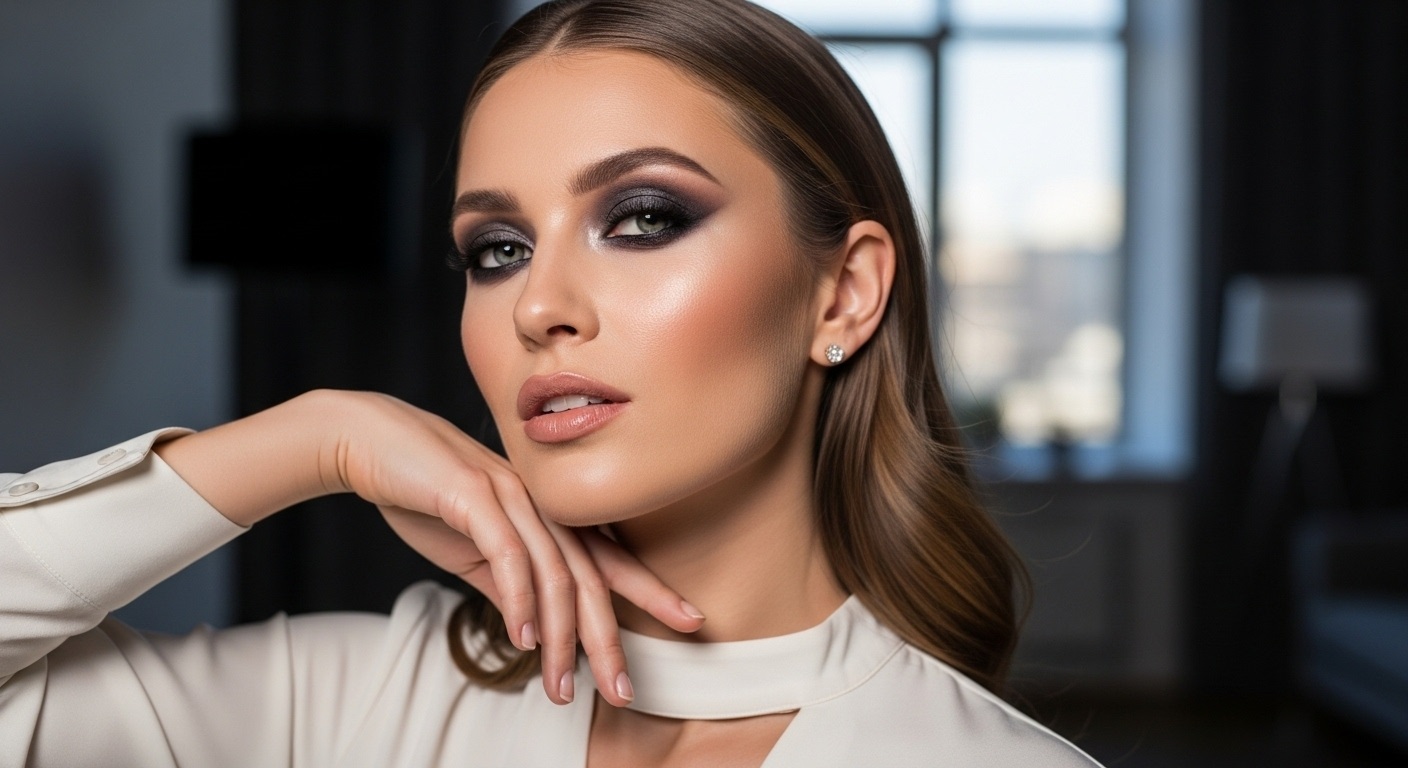
The classic smokey eye is characterized by its gradual gradient effect, blending dark shades outward from the lash line to create depth and dimension. While traditionally done in black and grey tones, modern interpretations include browns, purples, greens, and even jewel tones, all following the same blending principles.
What You'll Need
Essential Tools:
- Eye primer or concealer
- Fluffy blending brush (medium-sized, natural hair works best)
- Flat shader brush for packing on color
- Small pencil brush for detailed work
- Eyeliner brush (angled or fine-tipped)
- Clean blending brush for final buffing
- Cotton swabs and makeup remover for cleanup
Eyeshadow Shades:
- Light shade (highlight): Champagne, beige, or light shimmer
- Medium transition shade: Warm brown or taupe
- Dark shade: Black, dark brown, or deep grey
- Mid-tone shade: Medium brown, grey, or complementary color
- Optional: Shimmer shade for lid
Additional Products:
- Black or dark brown eyeliner (gel, pencil, or liquid)
- Volumizing mascara
- False lashes (optional, for extra drama)
- Setting spray
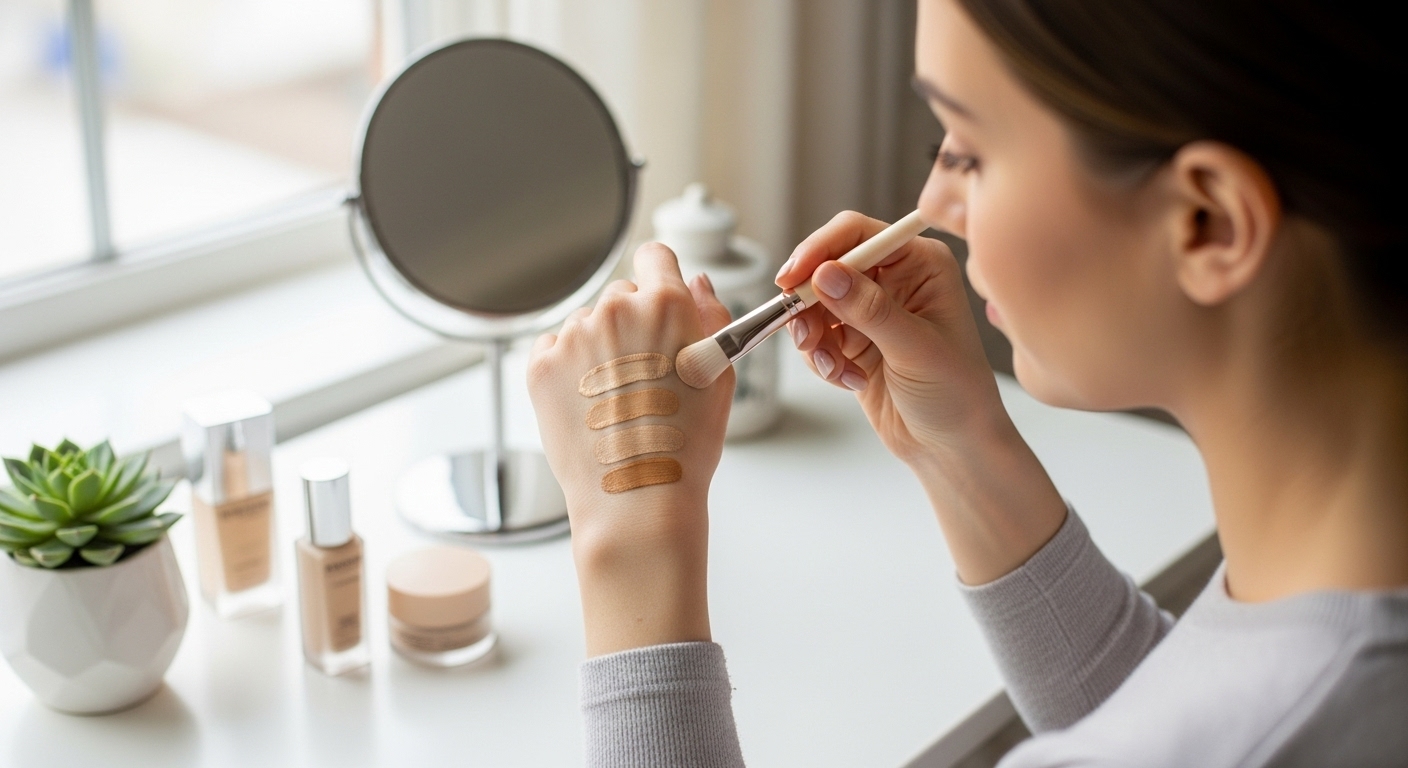
Prep Work: Creating the Perfect Canvas
Step 1: Apply Eye Primer
Start with clean, dry eyelids. Apply a thin layer of eye primer all over your lid, from lash line to brow bone. Eye primer prevents creasing, intensifies color payoff, and ensures your smokey eye lasts all night. If you don't have primer, a small amount of concealer set with translucent powder works as a substitute.
Step 2: Set with Skin-Toned Shadow
Using a fluffy brush, lightly dust a matte skin-toned shadow over the primed lid. This creates an even base for blending and helps transition between colors seamlessly. Think of this as creating a smooth canvas before painting.
Building the Smokey Effect: Step-by-Step
Step 3: Define Your Crease
Take your medium transition shade (warm brown or taupe) on a fluffy blending brush. Using windshield wiper motions, sweep the color back and forth in your crease. Keep your eyes open while applying to ensure proper placement. This shade creates the foundational depth and serves as a transition between your lid and brow bone. Extend slightly beyond your natural crease towards your outer corner for a lifted effect.
Step 4: Deepen the Outer Corner
Using a smaller, denser blending brush, take your darkest shade (black, dark brown, or deep grey). Apply this to the outer third of your lid in a V-shape: starting from your outer lash line, bring the color up into your crease, and blend it back toward the center of your lid. Think of drawing a sideways V. This creates the signature smokey depth. Use small circular motions to blend the edges, ensuring there are no harsh lines.
Step 5: Intensify the Lash Line
With a flat shader brush or small pencil brush, pack the same dark shade directly onto your upper lash line. Apply it thicker near the outer corner and taper it thinner as you move inward. This creates a soft, smudged liner effect that's less harsh than traditional liner. Wing it slightly upward at the outer corner for a lifted appearance.
Step 6: Add Dimension to the Lid
Now for the fun part—adding shine and dimension. Take a shimmery or metallic shadow in a complementary shade (champagne, bronze, or taupe shimmer works beautifully). Using your finger or a flat shader brush, gently pat this onto the center of your lid. The shimmer reflects light and makes your eyes pop. Don't bring it all the way to the outer corner; keep the outer third matte and dark for maximum dimension.
Step 7: Blend, Blend, Blend
This is the most crucial step. With a clean, fluffy brush, buff out any harsh edges where colors meet. Use circular motions at the perimeter and windshield wiper motions through the crease. The goal is a seamless gradient from dark outer corner to lighter inner corner. Don't be afraid to spend extra time blending—this is what separates a muddy mess from a professional smokey eye.
Step 8: Highlight the Brow Bone
Using your lightest, shimmeriest shade, apply a small amount just under your brow arch. This lifts the eye, creates contrast with your darker crease, and adds a polished finish. Blend softly into your transition shade so it doesn't look like a separate stripe.
Step 9: Line the Lower Lash Line
A smokey eye isn't complete without liner on the lower lash line. Using a small smudger brush or pencil brush, apply your darkest shade along the lower lash line, starting intensely at the outer corner and fading as you move inward. Stop about two-thirds of the way across to avoid making eyes look smaller. Smudge it slightly with your finger for a softer, smokier effect.
Step 10: Apply Eyeliner
This step is optional but recommended for extra definition. Line your upper waterline with a black pencil liner, getting as close to the lashes as possible. For more drama, you can tightline the entire upper waterline, which makes lashes look thicker and adds intensity. If you prefer, skip pencil liner and use a gel or liquid liner to create a thin line along the upper lash line, keeping it close to the lashes.
Step 11: Finish with Mascara
Curl your lashes, then apply 2-3 coats of volumizing black mascara to both upper and lower lashes. Wiggle the wand at the base of lashes to deposit more product and lift. Make sure to get every single lash, including those in the outer corners. This frames your smokey eye and pulls the whole look together.
Step 12: Consider False Lashes
For maximum drama—perfect for evenings or special occasions—add false lashes. Choose a style that suits your eye shape: wispy lashes for a romantic look, dramatic lashes for full glamour, or individuals for natural enhancement. Apply lash glue, wait 30 seconds for it to become tacky, then press the lash strip along your lash line using tweezers. Finish with one final coat of mascara to blend your natural lashes with the falsies.
Step 13: Clean Up
Dip a cotton swab in makeup remover and clean up any fallout under your eyes or smudges around the edges. This step makes your smokey eye look polished and intentional rather than messy.
Customizing for Your Eye Shape
Hooded Eyes
Place your transition color slightly higher than your natural crease so it's visible when eyes are open. Keep the darkest shades on the outer corner and extend them upward and outward rather than inward. Avoid putting shimmer in the center of your lid; instead, place it on your brow bone and inner corner.
Almond Eyes
Lucky you—almost any smokey eye technique works beautifully! You can go bold and dramatic or soft and sultry. Experiment with both horizontal and upward-lifting shapes.
Round Eyes
Elongate round eyes by extending your dark outer V further toward your temples. Focus dark color on the outer corners rather than the center. Wing your liner slightly to create a more almond shape.
Downturned Eyes
Lift downturned eyes by placing your darkest shade on the outer third of the lid and blending upward in an uplifting angle. Avoid bringing dark color down on the lower lash line too far inward. Keep shimmer on the center and inner lid to draw eyes inward and upward.
Close-Set Eyes
Keep inner corners lighter and place your darkest shade on the outer half of the lid only. Highlight your inner corner with a light shimmer. This creates the illusion of wider-spaced eyes.
Wide-Set Eyes
Bring darker shades closer to the inner corner of your eyes. Focus color concentration toward the center rather than the outer corners. This brings eyes visually closer together.
Color Variations on the Classic Smokey Eye
Brown Smokey Eye
Perfect for daytime or a softer look. Use warm browns ranging from light taupe to deep chocolate. This is universally flattering and great for beginners. Pair with brown liner and mascara for an especially soft effect.
Purple Smokey Eye
Gorgeous on green eyes! Use plums, mauves, and deep purple shades. Start with a light purple as your transition, build to a medium plum on the lid, and deepen the outer corner with a dark eggplant shade. Add a shimmer in the center for extra wow factor.
Green Smokey Eye
Beautiful on brown and hazel eyes. Use forest green, olive, and emerald shades. Keep it sophisticated by using matte greens with just a touch of shimmer in the center.
Navy or Blue Smokey Eye
A fresh alternative to black that makes blue eyes pop. Use navy as your darkest shade, blending with lighter blues and silvers. This looks modern and unexpected while maintaining the smokey depth.
Copper or Bronze Smokey Eye
Warm and flattering on all eye colors. Use warm bronzes and coppers with touches of gold shimmer. This works beautifully for autumn and looks stunning with warm-toned skin.
Common Mistakes and How to Fix Them
Mistake: Colors Look Muddy
Fix: This happens when you blend too much or use dirty brushes. Use clean brushes for each shade and know when to stop blending. It's also important to build color gradually rather than applying too much at once.
Mistake: Colors Look Patchy
Fix: Make sure you're using primer and setting it before applying shadow. Also, use the right brush—fluffy brushes for blending, flat brushes for packing on color. Cheap eyeshadows can also be patchy; invest in at least one good palette.
Mistake: Eyes Look Too Small or Closed Off
Fix: Don't bring dark color too far into your inner corner or too high into your crease. Keep the highest point of color at or below your natural crease. Use lighter shades in your inner corner and under your brow.
Mistake: Harsh Lines Between Colors
Fix: Spend more time blending with a clean brush. Use small circular motions at the edges where colors meet. Add a transition shade to help different colors blend seamlessly.
Mistake: Fallout on Cheeks
Prevention: Tap excess product off your brush before applying. Do eye makeup before foundation, so you can easily clean up fallout. Or, use the "eyeshadow shield" technique: place powder or a napkin under your eyes while applying eyeshadow, then brush away fallout.
Pro Tips for Next-Level Smokey Eyes
Use the Right Brushes: Invest in at least three good brushes—a fluffy blending brush, a flat shader, and a pencil brush. Clean brushes create cleaner, more precise looks.
Work in Natural Light: Artificial lighting can make it hard to see what you're doing. If possible, do your makeup near a window or with a daylight lamp.
Less is More at First: Start with less product and build up. It's easier to add more than to remove excess.
Prep Your Lids: Oil and moisture are the enemy of eyeshadow. Make sure lids are clean and dry before starting. Set your primer with powder for extra staying power.
Take Breaks: Step back from the mirror every few minutes to see the overall effect. We tend to apply too much when looking too closely.
Practice with One Eye: If you're new to this, practice the whole look on one eye, learn from any mistakes, then do the other eye better. Both eyes don't need to be identical—they're sisters, not twins!
Daytime vs. Evening Smokey Eye
Daytime Smokey Eye
Use softer colors like warm browns or taupes. Keep the dark shade concentrated close to the lash line and blend more softly into the crease. Use brown liner instead of black and one coat of mascara. Skip false lashes. The effect should be soft and diffused rather than dramatic.
Evening Smokey Eye
Go bold with deeper blacks, rich colors, or intense metallics. Extend dark colors higher and further out. Use black liner on both waterlines. Apply 2-3 coats of mascara and consider false lashes. Add extra shimmer to the center of the lid. Make sure to set with setting spray for long wear.
Conclusion
The smokey eye is a skill that improves with practice. Don't be discouraged if your first attempts aren't perfect—even professional makeup artists had to start somewhere. The key is understanding the basic technique, then customizing it for your unique eye shape and personal style.
Remember that makeup is art, and like any art form, it's meant to be enjoyed. Experiment with different color combinations, techniques, and intensities. Take photos to track your progress. Watch yourself improve as you develop muscle memory and an eye for what works on your features.
Most importantly, have fun with it! The smokey eye is a versatile, timeless look that can take you from sophisticated daytime elegance to dramatic evening glamour. Master this technique, and you'll have a go-to stunning look for any occasion. Your eyes are your most expressive feature—make them unforgettable!